treeshake原理解析
⚠️:本文所使用的
rollup是0.20.0版本,这是treeshake的第一个版本,代码非常简洁,更利于理解
treeshake 相信大家都知道,其本意是摇树(即摇掉树上的死叶子,用来代指打包时摇掉死代码)。这个概念说起来简单,可是 rollup 是怎么做到的呢,这也就是本文的主要目的了
rollup 的 treeshake 大概分为两个阶段,第一个阶段就是标记,这也是 rollup 的 treeshake 核心部分,即标记出来哪些是需要被摇掉的代码,第二阶段就是在
生成的时候直接不生成这部分代码到 chunk 中。
用例代码
现在有如下代码
sum ()函数用来求和,其中let x = 1 + 2和unused ()是无用代码
//need to be removed
let x = 1 + 2

function sum(...args) {
  let total = 0
  args.forEach(item => {
    total += item
  })
  return total
}

//need to be removed
function unused() {
  console.log('unused')
}

export { sum, unused }
index.js 中使用了
sum函数求和,其中unused是无用代码
import { sum } from './sum'
//need to be removed
let unused = 1 + 2
let arr = [1, 2, 3]
let number = sum(arr)
sum(1, 2, 3)
console.log(number)

export { number }
无用的代码理论上应该被摇掉,因为并没有被使用到,我们先执行一次打包观察是否被摇掉
执行 rollup -i src/index.js
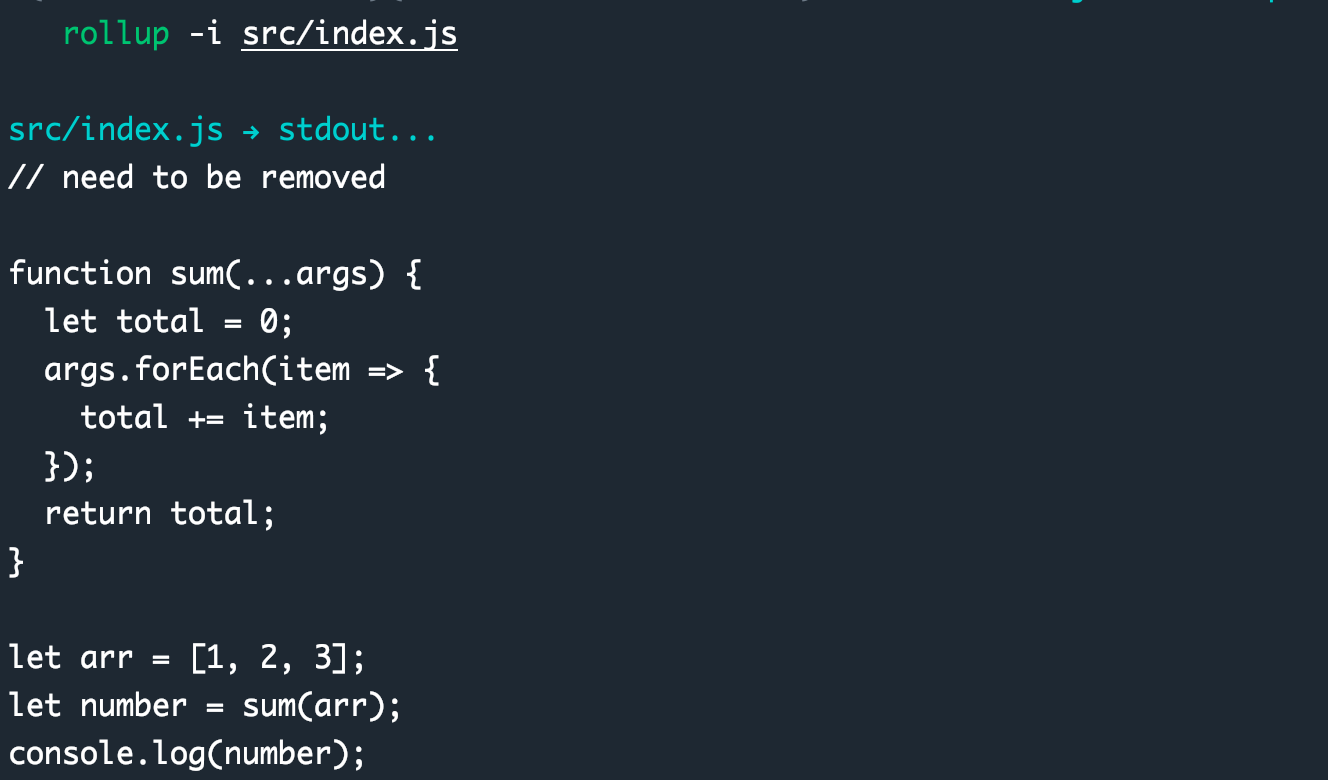
可以看到输出已经不包含无用代码了,只包含了 sum () 和 sum () 的调用部分
准备阶段
接下来我们分析下源码,首先是 build 阶段
// Bundle.js build
build () {
		return Promise.resolve (
      //this.resolveId 是将文件名称或者模块名称转化为绝对的资源路径
      this.resolveId ( this.entry, undefined ) )
  		// 将绝对的资源路径转化为 Module,这其中还会包含 Module 的组装,依赖分析,应用分析等等
			.then ( id => this.fetchModule ( id, undefined ) )
			.then ( entryModule => {
				this.entryModule = entryModule;
				this.modules.forEach ( module => module.bindImportSpecifiers () );
				this.modules.forEach ( module => module.bindAliases () );
      	// 不要被这个方法名字误导了,这个方法其实是为 reference 绑定 declaration
				this.modules.forEach ( module => module.bindReferences () );

				//
				entryModule.getExports ().forEach ( name => {
					const declaration = entryModule.traceExport ( name );
					declaration.isExported = true;

					declaration.use ();
				});

				let settled = false;
				while ( !settled ) {
					settled = true;

					this.modules.forEach ( module => {
						if ( module.markAllSideEffects () ) settled = false;
					});
				}

				this.orderedModules = this.sort ();
				this.deconflict ();
			});
	}
fetchModule
这其中 fetchModule 单独拿出来分析
// Bundle.js fetchModule
fetchModule ( id, importer ) {
 return Promise.resolve ( this.load ( id ) })
  .then ( source => transform ( source, id, this.transformers ) )
  .then ( source => {
   const { code, originalCode, ast, sourceMapChain } = source;
   // 组装 Module
   const module = new Module ({ id, code, originalCode, ast, sourceMapChain, bundle: this });
   this.modules.push ( module );
   this.moduleById [ id ] = module;
   // 解析当前 Module 的依赖
   return this.fetchAllDependencies ( module ).then ( () => module );
  });
}
fetchModule 主要是调用 this.load () 和 this.trasnformers () 解析资源,然后组装 Module,fetchAllDependencies () 和 fetchModule () 方法差不多,只不过处理的事当前 Module 的依赖,不再做单独分析,其中 new Module () 方法就是核心逻辑了。
new Module ()
// Module.js constructor
constructor ({ id, code, originalCode, ast, sourceMapChain, bundle }) {
  // 初始化一些属性
 this.code = code;
 this.originalCode = originalCode;
 this.sourceMapChain = sourceMapChain;
 this.bundle = bundle;
 this.id = id;
 //all dependencies
 this.dependencies = [];
 this.resolvedIds = blank ();
 //imports and exports, indexed by local name
 this.imports = blank ();
 this.exports = blank ();
 this.reexports = blank ();
 this.exportAllSources = [];
 this.exportAllModules = null;

  // 将代码组装成 magicString,magicString 是一个简便的操作 AST 的库
 // By default, `id` is the filename. Custom resolvers and loaders
 //can change that, but it makes sense to use it for the source filename
 this.magicString = new MagicString ( code, {
  filename: id,
  indentExclusionRanges: []
 });

 //remove existing sourceMappingURL comments
 const pattern = new RegExp ( `\\/\\/#\\s+${SOURCEMAPPING_URL}=.+\\n?`, 'g' );
 let match;
 while ( match = pattern.exec ( code ) ) {
  this.magicString.remove ( match.index, match.index + match [0].length );
 }

 this.comments = [];
  // 组装 statements 和 declarations
 this.statements = this.parse ( ast );
 this.declarations = blank ();
 this.analyse ();
}- magicString:这是一个内部的工具类,能更方便的操作 AST
- statement:个人理解是一个代码的执行单元,或者说小的代码段,例如
let x = 1 ; ley y = 2将会被拆分成两个statement - declaration:声明,这个
statement的概念是不一样的。例如sum (1,2)这是statement,但是不是declaration,let x = sum (1,2)这样才属于declaration
this.analyse 方法主要是对 statement.references 属性的设置,主要的用意是标记当前的 statement 引用(此引用非 import)的其他的元素,下面放两个例子
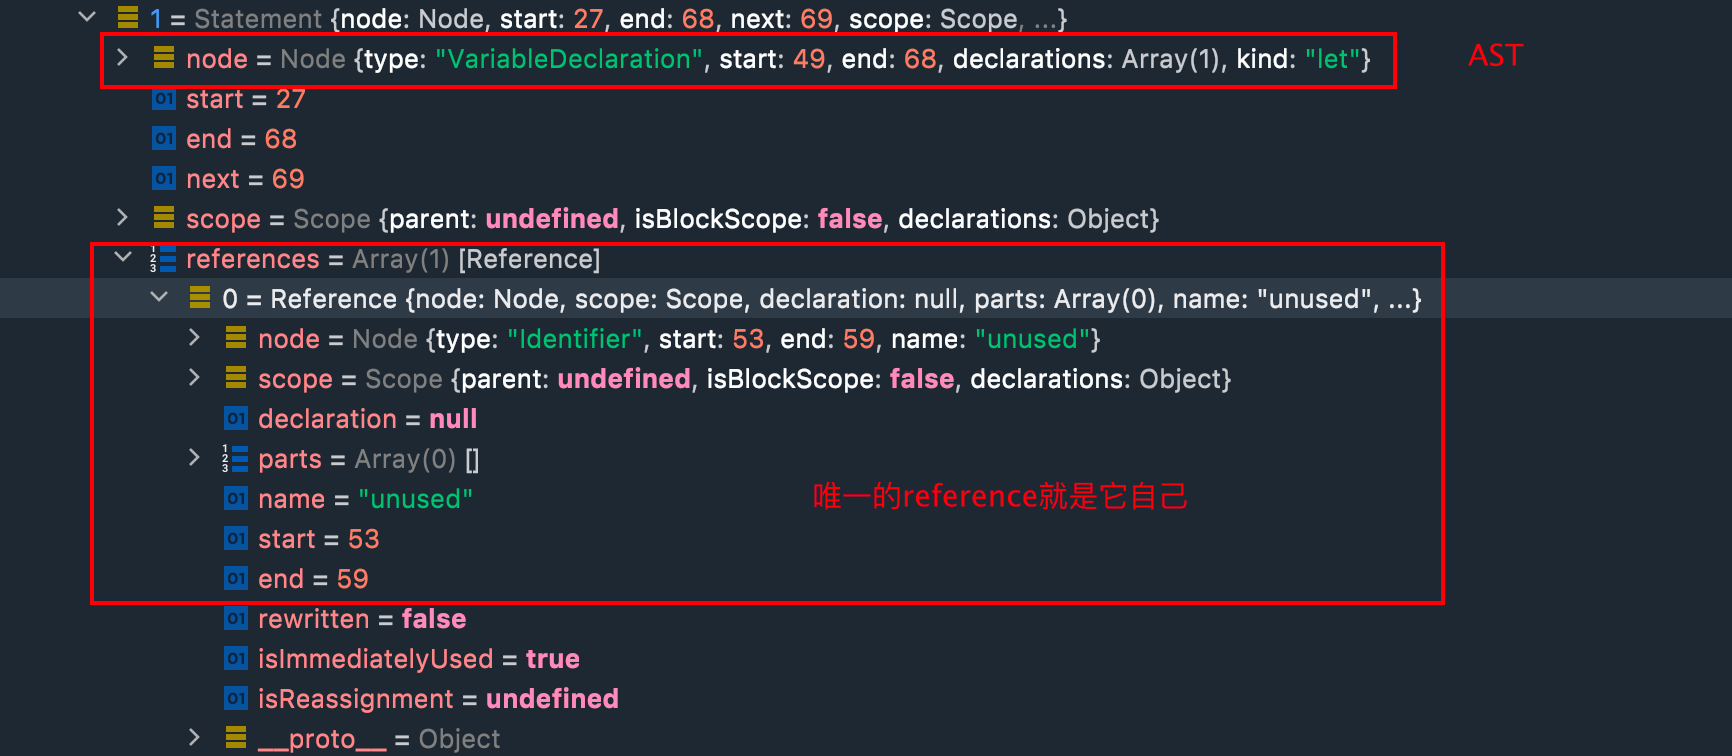
Reference 设置
// 例子 1
let unused = 1
这个 statement 生成的 reference 只包含他自己
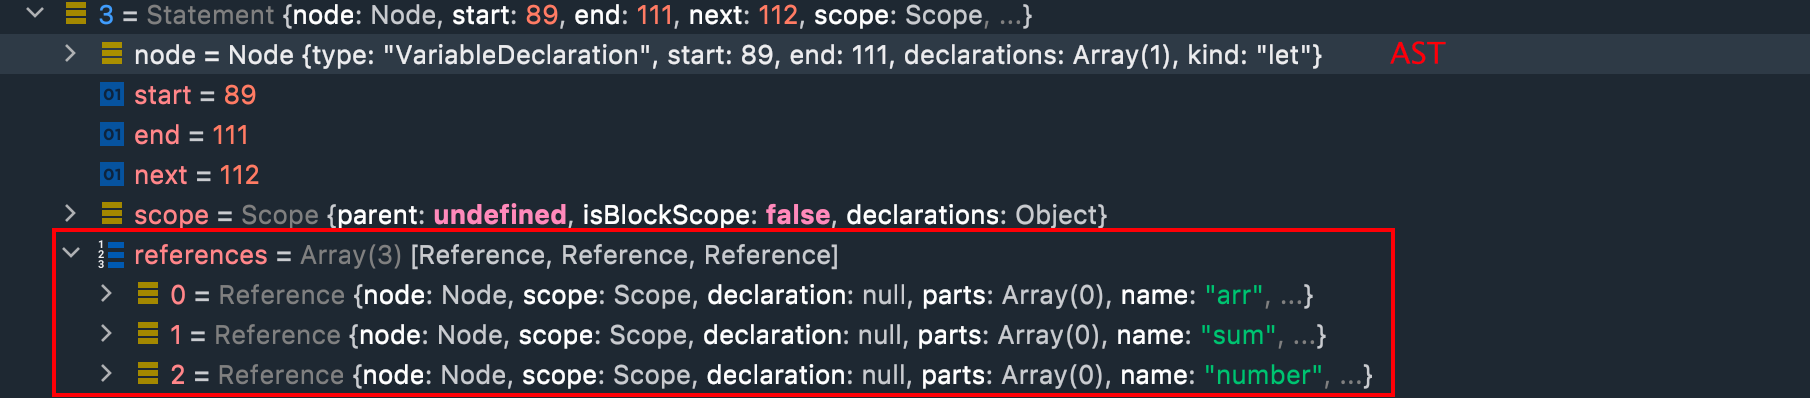
// 例子 2
//arr = [1,2,3]
let number = sum(arr)
这个 statement 将会生成包含他自己的三个 reference,分别是 arr,sum,number
bindReference
// Module.js bindReference
// 为了方便观察删除了部分分支代码
bindReferences () {
  statement.references.forEach ( reference => {
    // 查找当前 reference 的 declaration 信息,会递归的向上查找直到到达全局作用域
    const declaration = reference.scope.findDeclaration ( reference.name ) ||
          // 从自身查找,例如 import 等信息
          this.trace ( reference.name );
    if ( declaration ) {
      // 其实这个方法是为 reference 设置 declaration,只不过方法名字容易给人造成误解
      declaration.addReference ( reference );
    } else {
      // TODO handle globals
      // 没有找到声明就认为是全局变量
      this.bundle.assumedGlobals [ reference.name ] = true;
    }
  });
});
}

// Module.js findDeclaration
// 递归向上查找
findDeclaration ( name ) {
  return this.declarations [ name ] ||
    ( this.parent && this.parent.findDeclaration ( name ) );
}
bindReference 主要是为所有的 reference 查询其 declaration,如果没有找到就直接认定为全局变量,找到了就为该 reference 设置 declaration 属性,查找的原理是根据 scope 递归性的向上查找,直到找到或 parent 为空为止。
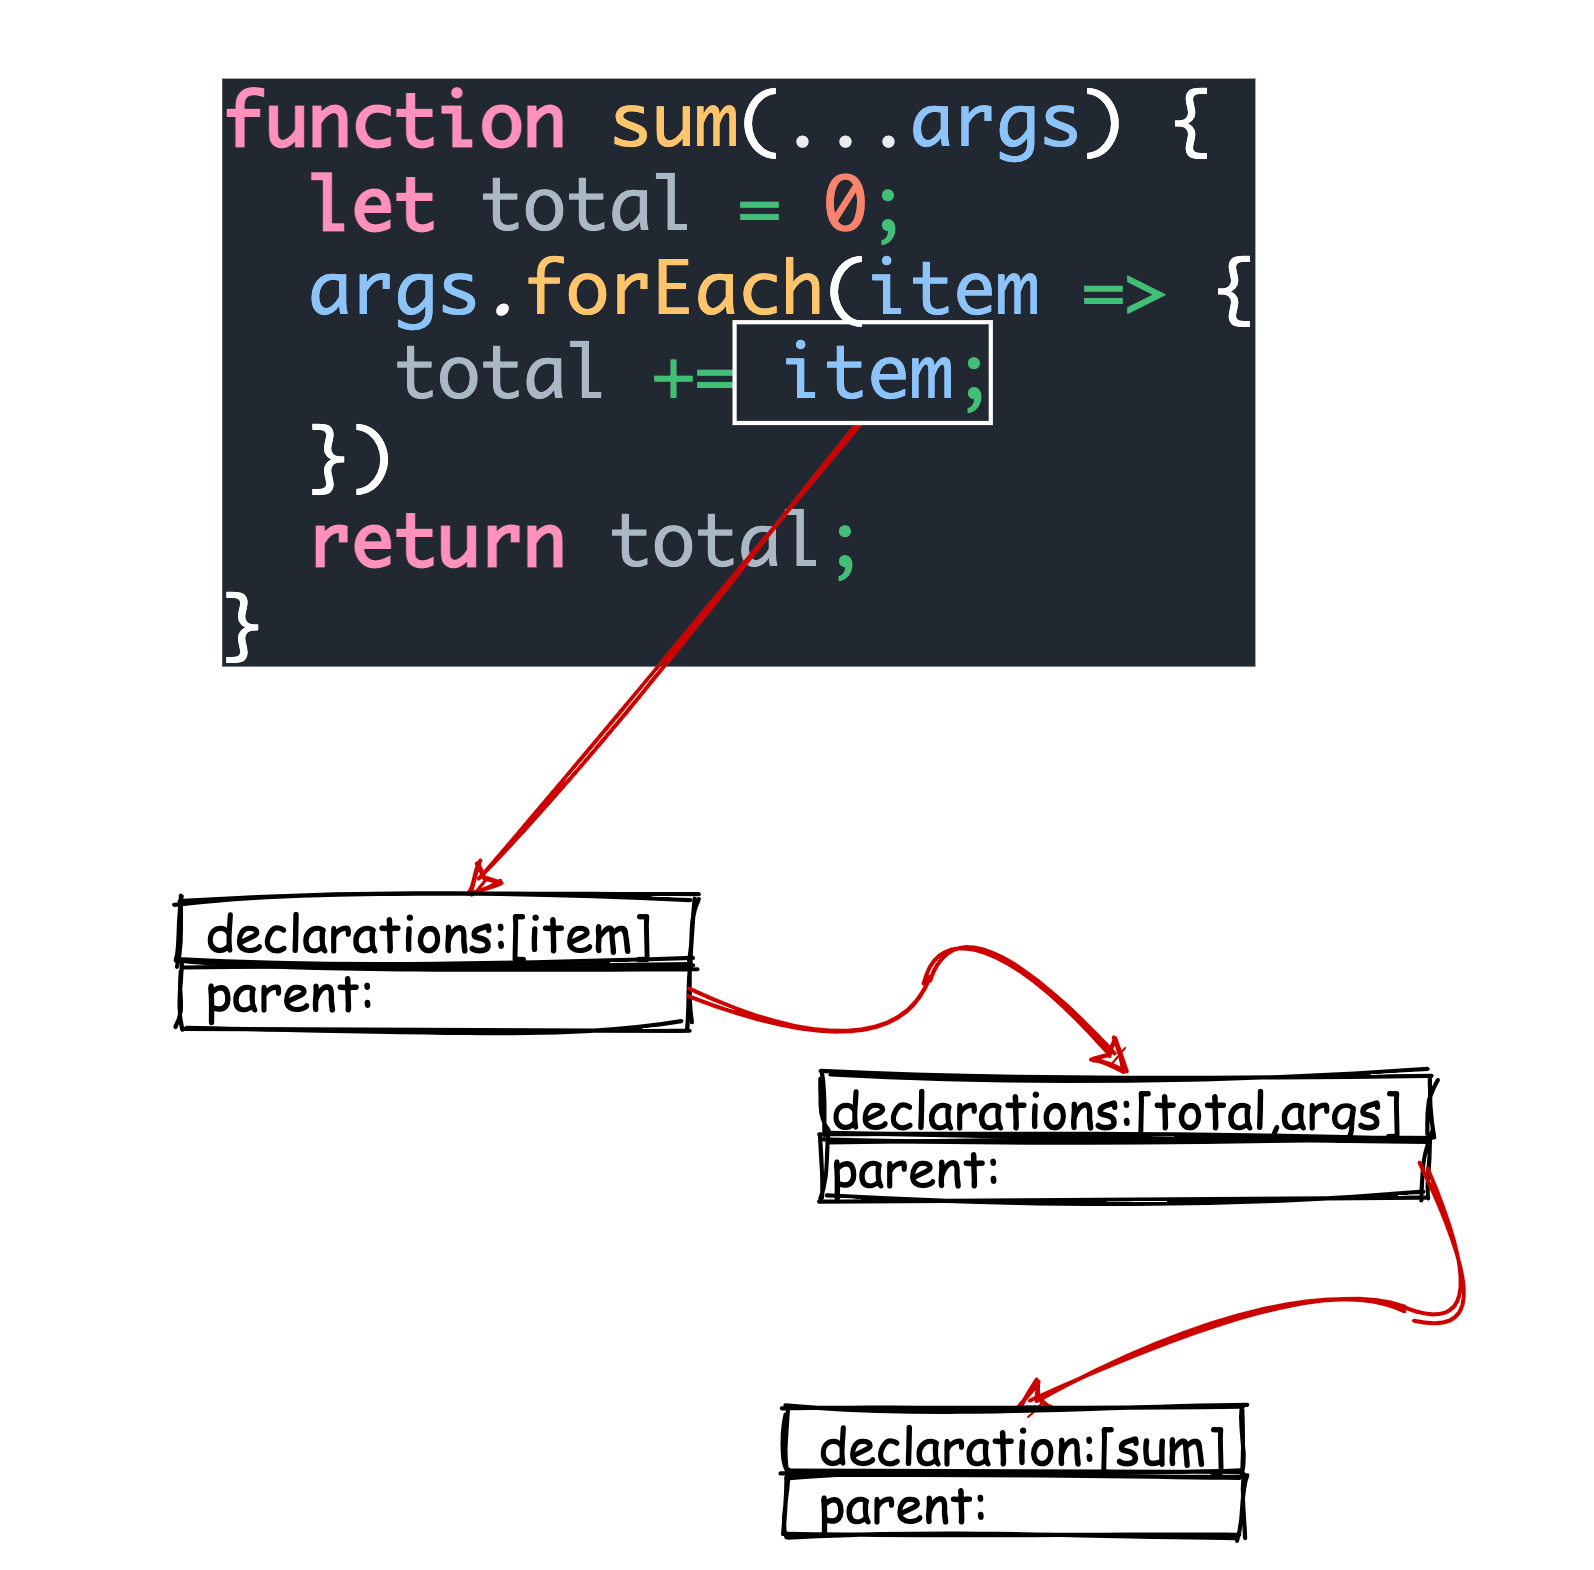
scope 大概就是对 reference 的生效作用域进行标记和方便查找的,例如上图中 item 变量的 scope 中只有自己 item,parent 中包含 total 和 args,parent.parent 中包含 sum (),没有 parent.parent.parent,因为 sum () 已经到了顶层作用域(也就是和全局变量同级),查找的顺序也是从自身递归像上查找,找到了就为自身设置属性,没有找到就认为是全局变量。
到此为止,准备阶段基本结束
标记阶段
// 为 export 的 declaration 设置标志,凡是导出的都会被设置成
entryModule.getExports ().forEach ( name => {
  const declaration = entryModule.traceExport ( name );
  declaration.isExported = true;
  declaration.use ();
});

use () {
  this.isUsed = true;
  if ( this.statement ) this.statement.mark ();
  this.aliases.forEach ( alias => alias.use () );
}

mark () {
  // 设置 isIncluded 标志,这个属性非常重要
  if ( this.isIncluded ) return;
  this.isIncluded = true;
  this.references.forEach ( reference => {
    // 对整个 statement 的每个 reference.declaration 进行标记
    if ( reference.declaration ) reference.declaration.use ();
  });
}
注意,上述标记只是导出涉及到的部分代码 (不包含导出本身),方法并不算复杂,其实就是对 statement 进行 isIncluede 标记,对 declaraion 进行 isUsed 标记。
// Bundle.js
let settled = false;
while ( !settled ) {
  settled = true;
  this.modules.forEach ( module => {
    if ( module.markAllSideEffects () ) settled = false;
  });
}

markAllSideEffects () {
  let hasSideEffect = false;
  this.statements.forEach ( statement => {
    if ( statement.markSideEffect () ) hasSideEffect = true;
  });
  return hasSideEffect;
}

markSideEffect () {
  // 标记了就不再标记
  if ( this.isIncluded ) return;
  const statement = this;
  let hasSideEffect = false;
  //walk 是一个遍历 AST 的方法
  walk ( this.node, {
    enter ( node, parent ) {
      if ( /Function/.test ( node.type ) && !isIife ( node, parent ) ) return this.skip ();

      // 如果是函数调用或者 new 创建实例的方法,就认为有副作用
      if ( node.type === 'CallExpression' || node.type === 'NewExpression' ) {
        hasSideEffect = true;
      }

      else if ( node.type in modifierNodes ) {
        let subject = node [ modifierNodes [ node.type ] ];
        while ( subject.type === 'MemberExpression' ) subject = subject.object;
        const declaration = statement.module.trace ( subject.name );
        if ( !declaration || declaration.isExternal || declaration.statement.isIncluded ) {
          hasSideEffect = true;
        }
      }
      if ( hasSideEffect ) this.skip ();
    }
  });
// 对 statement 以及 statement 的 reference 进行标记
  if ( hasSideEffect ) statement.mark ();
  return hasSideEffect;
}
上述的代码就是标记副作用的核心代码,可以认为 hasSideEffect 和 isInclude 是基本等价的,一旦被设置为有副作用就表示不会被 treeshake
上述代码其他的还好,但是为什么函数调用 (node.type==='CallExpression') 和创建实例 (node.type==='NewExpression') 不会被 treeShake?
其实思考一下就能得出问题的答案,函数调用是不确定函数体内部做了什么的,例如下面的代码
function foo() {
  eval('window.foo==foo')
}
foo()
就像函数 foo,动态的设置全局变量,这样是无法被 AST 准确解析出来的,同理,如果我更改了一个类的 prototype.constructor,同样不知道创建这个类时到底会做出什么样的操作,所以都会被标记成有副作用(仅限当前的 rollup 0.20.0 版本,后面的版本可能对此问题有了解决方案)。自此,treeshake 标记阶段结束
输出阶段
this.orderedModules.forEach ( module => {
  // 调用 render 方法将输出 module 源代码
  const source = module.render ( format === 'es6' );
  if ( source.toString ().length ) {
    magicString.addSource ( source );
    usedModules.push ( module );
  }
});

render ( es6 ) {
  let magicString = this.magicString.clone ();
  // 遍历每一个 statement,如果 isInclude 为 false,输出代码中直接移除掉这个 statement
  this.statements.forEach ( statement => {
    if ( !statement.isIncluded ) {
      magicString.remove ( statement.start, statement.next );
      return;
  }
    ....
}
输出阶段对 treeshake 的操作就非常简单了,只要 isInclude 属性为 false,就会直接调用 magicString.remove () 方法在输出代码中直接删除这个 statement